
Good Monday morning to all my fellow bloggers!
Having the blues? Feeling down as you need to work? Falling mentally ill because you need to start the grind again? ha ha..welcome to the Monday morning!!
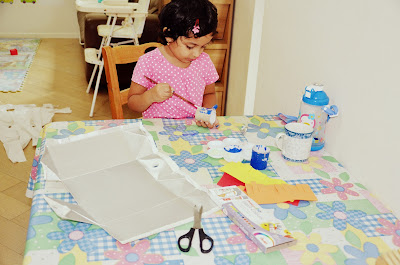
I have had a hectic weekend, not the relaxing sorta one which i would have dreamed off :( Banker was really ill and the kids were just recovering. My helper was also off on Sunday and believe me i dint have a spare minute even to sit and think about crocheting or blogging. The brighter side being me and the little miss did lots of crafting. The school has asked to make a lantern for the Mid-Autumn festival using recycled materials. You can read more about this festival HERE. A craft project to be done by both the parents and the kids together. I dig such things and immediately set off to get a creative lantern done.
 She painted toilet paper rolls blue.
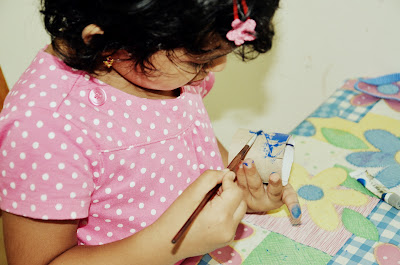 A really keen painter i must say !

These were our raw materials. Rather recycled materials. An empty juice carton and some form sheets which i had bought a while ago.

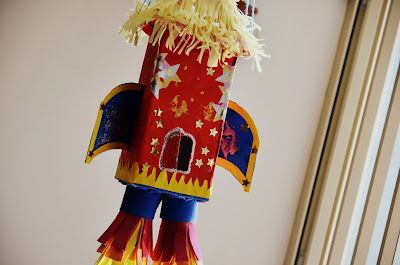
We made a rocket lantern using the following materials :
1.An empty juice carton/milk carton. Wash it thoroughly and clean it. Cut it open and cut off the top.
2.Toilet paper rolls. Cut a single roll into 2 pieces. Cut 1 inch long stripes on the rolls and fold them outwards so that they become stick-able.
3.Take plain A4 sheets. Give your pre-schooler her favourite color paints and a brush. Ask her/him to paint the whole sheet with the color. I did it in red, blue and yellow.
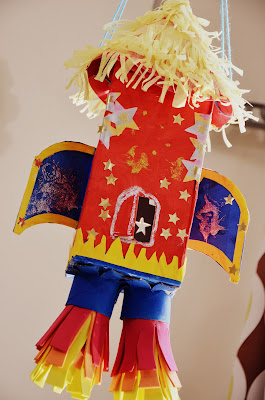
4.Stick the red color paper over the juice carton for making the body of the rocket red.
5.Cute rocket wings out of any cereal box and stick the blue sheet over it.
6.Paint the toilet paper rolls blue and glue them on to the base of the juice carton.
7. Here's the part i loved the most - Cut foam sheets in 3 different colors and layer them for a fire effect. Roll them together and fit it in the toilet roll and voila!! a beautiful effect :)
 8.Make any kinda decorations your toddler asks for. Give her some glitter glue and some punches and you are good to do!
9.Cut a circular piece of card board and roll it into a cone. Stick it on the top of the carton for the rocket's top.
10.I cut some paper fringes from craft paper and the little miss stuck it on the rocket.
11.Make holes on either side of the carton and just thread some yarn through them so that the little ones can hold it.
Lo and behold your rocket lantern is ready!!!
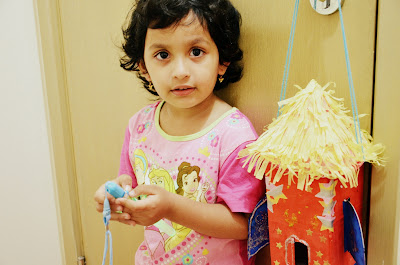 She says she's worked real hard for it :|

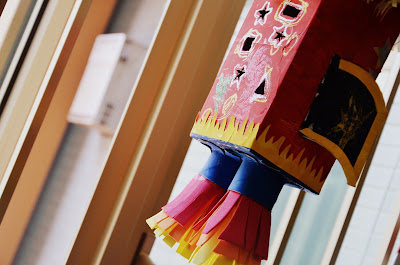 We put a glow stick inside it through the door i cut in the carton. It glows and all..She is thrilled to bits when i did this. Makes me so happy that i a m a crafty and a stay at home mom :)

Can you believe that i have hardly hooked and my granny square count is WAY wayyyyy behind. Off i go to attend to it! Awe...not so fast says my kids, there is 2 meals and 2 naps inbetween my and my favourite hook right now. *sigh* soooo long!
Have fun with your kids, they don't last long :)
Love,
xxx
Having the blues? Feeling down as you need to work? Falling mentally ill because you need to start the grind again? ha ha..welcome to the Monday morning!!
I have had a hectic weekend, not the relaxing sorta one which i would have dreamed off :( Banker was really ill and the kids were just recovering. My helper was also off on Sunday and believe me i dint have a spare minute even to sit and think about crocheting or blogging. The brighter side being me and the little miss did lots of crafting. The school has asked to make a lantern for the Mid-Autumn festival using recycled materials. You can read more about this festival HERE. A craft project to be done by both the parents and the kids together. I dig such things and immediately set off to get a creative lantern done.


These were our raw materials. Rather recycled materials. An empty juice carton and some form sheets which i had bought a while ago.

We made a rocket lantern using the following materials :
1.An empty juice carton/milk carton. Wash it thoroughly and clean it. Cut it open and cut off the top.
2.Toilet paper rolls. Cut a single roll into 2 pieces. Cut 1 inch long stripes on the rolls and fold them outwards so that they become stick-able.
3.Take plain A4 sheets. Give your pre-schooler her favourite color paints and a brush. Ask her/him to paint the whole sheet with the color. I did it in red, blue and yellow.
4.Stick the red color paper over the juice carton for making the body of the rocket red.
5.Cute rocket wings out of any cereal box and stick the blue sheet over it.
6.Paint the toilet paper rolls blue and glue them on to the base of the juice carton.
7. Here's the part i loved the most - Cut foam sheets in 3 different colors and layer them for a fire effect. Roll them together and fit it in the toilet roll and voila!! a beautiful effect :)

9.Cut a circular piece of card board and roll it into a cone. Stick it on the top of the carton for the rocket's top.
10.I cut some paper fringes from craft paper and the little miss stuck it on the rocket.
11.Make holes on either side of the carton and just thread some yarn through them so that the little ones can hold it.
Lo and behold your rocket lantern is ready!!!


Have fun with your kids, they don't last long :)
Love,
xxx
that has to be the best rocket I have ever seen! It's amazing, their are going to be really impressed with that! Love the fire and the glow stick, Heather x
ReplyDeleteSuper rocket lantern. Once lit it looks ready to take off :)
ReplyDeleteGoing back to hooking after a break is even more fun. Enjoy it all ... playing mom and playing hooky.
Love.
Great job on the rocket lantern - it looks pretty cool. :)
ReplyDeleteOhh so beautiful.. and very clever idea... Kissing your sweet daughter...:))
ReplyDelete